Rate Season Setup
To follow this topic, you must have access to the GM Functions module.
Your security role must have the following permission(s):
- Rates
If you do not have these permissions and believe you should, please reach out to your property's manager or administrator for further assistance.
A necessary component to building rates, managing your rate seasons determines if and when a given rate code can be booked in addition to the amount offered when booking. Before you begin, be aware that you must have a rate to edit (see Rate Plans or Dynamic Rates as needed).
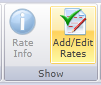
To begin, access the rate you wish to add or edit seasons in. Then, from the rate's Rate Info menu, select the Add/Edit Rates button located in the upper Show ribbon to access rate season setup.
Dynamic rates derive their values from the rate plans they have been linked to. Likewise, dynamic rates don't have "seasons" like a rate plan does - instead, they refer to the rate seasons created under their linked rate plan.
Once you have accessed the rate season menu for a dynamic rate, you will be presented with a single drop-down option: Rate Adjustment.
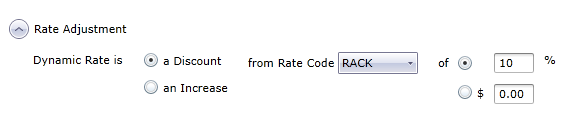
Use this option to specify whether the dynamic rate should be a deduction from or increase to the linked rate code, then specify if the adjustment should be a percentage (%) or flat ($) amount. After applying your settings, you can use the Display Rates section below to select individual seasons from the linked rate plan and preview the final offered amount before saving and committing your changes.
For example, in the above figure, the rate adjustment is read as a 10% discount off the RACK rate code. This means that anyone who books this particular rate will save 10% of whatever the current advertised value for the RACK rate is.
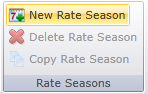
If creating a new rate season, click the New Rate Season button at the top of the menu to add a new blank row.
Otherwise, locate the season you wish to modify and check mark the Select option to the left of it to highlight it. Alternatively, if you would like to copy an existing season and simply adjust it, highlight the season you wish to copy then click the Copy Rate Season button at the top of the menu.

Notice that when you first create a season (but not copy), the start and end dates match your current business date in Chorum. Update the values to reflect the season's appropriate start and end dates, with the Start Date always being the earliest date the rate should be available for, while the end date should be the latest date the rate is available for. If the rate should be available for the foreseeable future, set the end date far into the future. For example, in the above figure, the last season's end date is 12/31/2029.
If you have set up rate tiers for this rate and wish to use them with this season, be sure to checkmark the Use Rate Tiers column to apply them to this season. At any time, you can uncheck the option if no longer desired.
It is also strongly recommended for rate plans featuring multiple seasons to provide a brief description of each season via the Comment column. This is not required, but is useful if a concern over a certain rate season's validity ever comes up later.
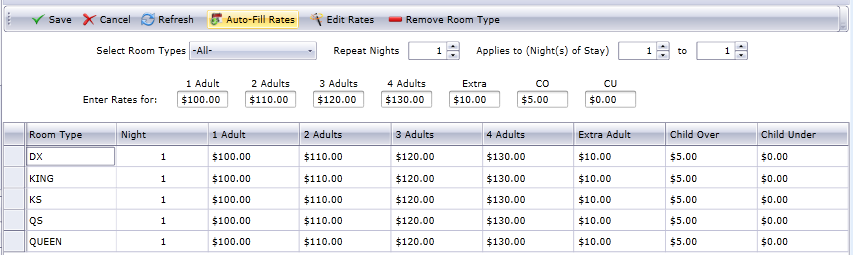
Once the season's columns are set, save your progress then begin editing the season's rate amounts (you may need to re-select the season after saving). The lower half of the screen darkens to indicate you can now fill it in. Be aware that depending on the rate plan created, the options presented may vary - for example, the below figure depicts a Daily (Day of Stay) rate, the only format that uses the Repeat Nights option.

If this is the first season added to the rate plan, be aware that you must use the auto-fill rates option after setting your initial rate values before any can be modified manually. Otherwise, if editing an existing season, click the Edit Rates button and select the value you wish to change, typing in the new amount and clicking the Save button in the middle of the menu to save your work.
See below for a description of each season option:
|
Option |
Description |
|---|---|
|
Select Room Types |
Designate which room type(s) the rate should be available for using this drop-down menu. If the rate will be available for all room types, leave the selection on -All-. |
|
Applies to (Days of Week) |
This option only displays for Daily (Day of Week) Rate Codes. If you intend for the rate to fluctuate higher or lower on certain days of the week, use this option to control which day(s) your rates apply to when clicking the Auto-Fill Rates button. If the rate code will post the same revenue regardless of day of the week, leave this option on -All-. |
|
Repeat Nights |
This option only displays for Daily (Day of Stay) Rate Codes. This sets the rate’s Posting Period, counting from the guest’s Arrival Date and repeating after the set number of days have elapsed. |
|
Applies to (Night(s) of Stay) |
This option only displays for Daily (Day of Stay) Rate Codes. If you intend for the rate to fluctuate higher or lower a certain number of days into the guest’s stay, use this option to control which days your rates apply to when clicking the Auto-Fill Rates button. For example, the hotel is offering a promotional rate granting a discount on every 3rd day of a single guest stay. The hotel sets the Repeat Nights option to 3, then sets the Applies to options to 1 to 2 and applies a rate of $150 using the auto-fill button to all room types. Then, they change the Applies to options from 1 to 2 to 3 to 3, this time applying a rate of $100. In the rate worksheet pictured below this table, each room type will now show nights 1 and 2 with a rate of $150, while night 3 has a rate of $100. As long as the guest(s) continue using this rate, every third night will post the lowered rate. |
|
Enter Rates for |
Set the amount that should apply to the booking based on the number of guests in the room. Be aware that the Extra column applies to bookings with 5+ adults staying in the room. CO and CU are short for Child Over and Child Under, respectively, for children over or under a specified age. Chorum does not track what age defines a child as over or under - this is purely at your hotel’s discretion. |
Once you season is built, it should look similar to the below figure. Again, keep in mind that the rate's format may result in minor differences in presentation.
Once your work is saved, start over as needed for any additional seasons you must add or modify.
Understandably, a rate plan's seasons can never overlap with one another (though they can freely overlap with other rate plans). Whenever you add a new season and set the start and (or) end date to overlap another season's start or end date, Chorum will automatically adjust the start and end dates of the "overwritten" season as needed to ensure no overlap occurs. This same logic applies if you attempt to edit an existing season and make similar changes.
In the above figure, the rate plan in question originally only featured a single season beginning 6/14/2018 and ending 12/31/2029 - the "Daily Rate" season. Some time after the rate season was made, a second season was added (the "Event Rate") that both started and ended on 6/15/2018. Since this date was right in the middle of the daily rate season, Chorum split the season to end the day before the event rate starts (6/14), then starts the daily rate again the day right after (6/16).
If a new season you made completely overlaps another season for the same rate plan, the old season is automatically deleted as if you had selected the season and pressed the Delete Rate Season button at the top of the menu.
|
Learn to navigate the GM Functions menu. |
|
|
Configure your property's rate plans. |
|
|
Configure your property's dynamic rates. |